In my last blog I wrote about DIY easy composting methods, now I will be discussing on how to make improved compost for your vegetable gardens, which is basically the same process, but done in a more systematic way, plus adding some new materials so you can get even more benefits from your organic agriculture, by means of improving the quality of your compost.
Just as a reminder from my last blog I will add a list of:
Tools you will need
- Shovel
- Hay fork
- Bucket
- Rack
- Wheel barrow (optional)
- Leather gloves
- Goggles
- Nose and mouth filter
- Work or rubber boots
- Comfortable work clothing
- Two bins or two sheets of used or new plastic -size depending upon the volume of compost to be made
And now:
List of materials
- Grass clippings, fallen leaves, twigs, young weeds, shells (peanuts, pecans, walnuts, …)
- Refuse vegetables scraps plus others like overripe, leftovers, discarded parts (peels, skins, seeds, coffee grinds or tea bags, leaves, roots, stems, wilted flowers, …)
- Dung from domestic animals (any, except from dogs and cats)
- Charcoal
- Molasses
- Yeast
- Expired milk and/or yogurt
- Soil, the darker the better -darker means richer in organic matter, especially soil from under trees or bushes.
- Wood ashes
Easy technical information
Over time, adding good-quality improved compost to your vegetables garden, loan or field provides nutrients in just the natural balance needed, which is released slowly for plants to use. It enriches soil health and enhances the soil food web by means of the diversity of beneficial organisms that break down organic matter. Builds up soil structure by preventing erosion through the creation of soil aggregates -bigger soil particles. Improves water infiltration and retention rates avoiding flooding through better drainage, i.e. creates more water-holding ability in soil, which means less watering -longer periods between watering and less water volume needed as well. Compost also acts as a buffer to toxins from foreign materials. Not to mention, it is free plant food provided (not bought) by yourself. With very little effort, just about anything can contribute to a mineral and microbe rich compost: fruit and vegetable scraps and leftovers, grass clippings, dried leaves, tea bags, coffee grounds and filters, eggshells, seafood shells (ground if possible), molasses, whey, expired milk or yogurt, charcoal, straw and even dog hair, wood scraps and sawdust. Time is the only other ingredient you will need.
Composting is quite easy, but there are several options available, you will have to consider a few factors. You will want to pick a method based on your needs, your availability of materials and the space available. But you do not need to worry about filling up the composter you choose, be it a bin or just above a plastic sheet on the bare ground. Because organic matter is constantly breaking down and reducing in volume and as you are harvesting the finished compost, you will most likely never fill the entire bin or pile. If you are a non patient enough person or need compost as soon as possible, then you will need to choose a method that allows you to hot-compost, i.e. pile instead of a bin. Perhaps the most important decision is considering how much time you are willing to invest. Once you choose the method that fits best for you and create the right conditions, you can let nature do the hard work of breaking down your organic matter and turning it into great improved compost for your vegetables garden, loan or field.
Bin composting
You can build a plywood, scrap or refuse wood bin about 4 ft square and about 3 to 4 ft tall with an open bottom in the front. Make a simple wooden lid that just sits on top or a piece of black used plastic. Plastic from garbage bags is OK, but put some boards or even rocks or bricks on top of it to prevent it from being blown away. Then make the front of it slightly smaller allowing a dispensing slot along the bottom front that’s about 4″ tall by the width of your bin. This allows you to simply scoop up the finished compost with a flat shovel or a rack. You will have great compost in about 6 months to one year, depending on your weather conditions. The warmer weather the faster composting. If you are fortunate enough to live at or near enough to the beach, you can add plenty of seaweed/kelp as green material and you will be amazed how quickly that material breaks down.
Alternative “bin”
One great method and a very cheap one, that I want to mention is the following. You can put all the materials: leaves, grass clippings, weeds, pruned (thin) branches (cut no less than 4-5 inches long), kitchen scraps, etc. in one large black garbage bag, spray it lightly with a garden hose or a bucket, just enough to moisten the dry materials, then tie the whole package tight and place it in a sunny corner in your back yard or field and let the sun decompose the entire contents. Shake it or roll it carefully once a day for the first two weeks in order to homogenize the mixture and loosen it to allow for ventilation. The heat that is generated inside the bag will destroy any seeds, insects, pathogens, etc. and you will have compost in a shorter time.
You may have stuffed the bag to the top, but once the materials are decomposed (broken down) what ends up is rather a small amount, so it is better if you can fill several bags. It is very important not to put too much water inside to prevent rotting instead of fermenting (I will discuss the “fist test” further down). As long as you have grasses, weeds, flowers, food scraps and leftovers incorporated in the mix, you should have enough moisture where extra water is probably not necessary. If you have mostly dry leaves, sawdust, wood scraps and dung they will of course need more moisture. Just tie up the bag and let the sun do the work. Any odor will quickly dissipate once your composted material is broken down. Note: if the bags are filled with mostly dry leaves, sawdust or wood scraps, they will decompose at a slower rate.
Commercial bins are usually made from black or dark colored recycled plastic -HDPE, LDPE or PS- and can come in different sizes and shapes -from square to cylindrical. All of them have a lid to cover the container. These bins are good for cold-composting and a good option for urban or suburban locations. Cold composting means the highest temperatures do not rise so much as they do in hot-composting, where those temperatures rise up to 60 to 70° Celsius (140 to 158° Fahrenheit). However, you must note that they present a few difficulties. You will not be able to use them for hot-composting, for example, because being a closed bin makes it difficult to maintain the necessary conditions for a high temperature compost. Additionally, the containers can only hold a limited volume of composting materials.
Extracting compost from a closed bin can be a challenge because the openings are usually only about one foot above ground level. If you want to make the job easier, you can move the entire unit to a different spot. These kinds of bins usually do not have a bottom to them, therefore the compost materials will just drop out when the bin is lifted. Fork back into the bin everything that is at the top of the compost pile at the new bin location and harvest all the decomposed (broken down) materials at the bottom. The average price for typical closed bins runs between $50 and $250 US Dlls. Although, some local authorities in different Countries sometimes offer bins to residents at a subsidized cost.
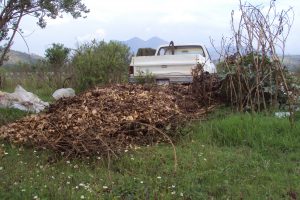
Compost piles
If you have an amount of materials for composting big enough that it does not fit in one or several bins, you may optionally use one or more square plastic sheets. My recommendation is to use 6 x 6 ft, or 8 x 8 ft since they are the best sizes in order to have easy ways to work them out. You may disregard the plastic sheets and set up your compost pile directly on the ground.
Procedure is as follows:
- Level the ground where you will do the composting, considering a working area around for easy moving while working
- Extend the plastic sheet or sheets on the ground (if you are using one)
- Using stakes, a string and a measuring tape, make a draft or a square which will set the limits for your pile
- Fill out the whole square area with small branches, sticks and twigs a couple of inches thick for ventilation
- Add some water to moisturize without soaking
- Add a 4-inch layer of dead leaves or grass clippings or a mixture of them
- Add more water to keep moisturizing the layer, especially dry leaves being careful not to soak it
- Add one more 4-inch layer of fruits and vegetables scraps, refuse, leftovers, coffee grounds, tea bags, peels…
- Add the next 4-inch layer of cows, sheep, goats, rabbits, poultry, horses… dung (if you have access to it)
- Add more water if needed, depending on the moisture content of the dung you are using, if any. Remember: do not soak it
- Add a 2-inch layer of soil that you can get from the ground around or near the pile
- Add water as needed to moisturize it without soaking
- Repeat the process beginning with a new 4-inch layer of dry leaves and or grass clippings. You can repeat the process several times until the pile reaches a height of 4 to 5 feet
- Cover the pile with plastic (e.g. used plastic bags, sacks or else) or with a final 4-inch layer of grass clippings and or dry leaves
- Moisturize this final layer but remember not to soak it
If you still have some more materials you should start a new compost pile next to the first one, leaving a distance of 4 feet in between them for easy working around the piles.
Notes:
- Optionally you can add some 5% whey to the water or 2-3% of outdated milk or yogurt plus 3-5% of sugar or molasses to increase and speed up the fermenting process and the amount of beneficial lacto bacillus (milk bacteria)
- If you add sugar or molasses to the water you should also add one ounce of bakers yeast to 5 gal of water/sugar-molasses mixture
- You can also add cinder from your firewood to the dry leaves/grass clippings layers -the amount is optional, depending on availability
- For the first two weeks, thoroughly turn the pile with a pitchfork and or shovel by moving it to a place next to it on a daily basis to prevent temperature from rising up to or beyond 70° Celcius or 158° Fahrenheit.
- Before turning, make another square of small branches, twigs and sticks to provide ventilation from under the pile
- Try to keep the cubic shape by drafting another square with the same measurements as the first one (optional)
- You should not have to water anymore, unless the pile gets too dry, since additional waterings may delay the fermenting process, therefore lengthening the whole composting process.
After 4 to 8 months (or even one year) you will get prime quality compost, depending on the weather conditions at your location.
Pit composting
You can dig a pit or a trench for composting in any place where you are planning to plant a tree, they are dug to bury your waste. You just keep adding your kitchen scraps, vegetables refuse, ashes from the fireplace, dung from domestic animals, milk and yogurt leftovers, sawdust, wood shavings, dry leaves, grass clippings, tea bags, coffee grounds, … Every time you add any organic materials you have to add some soil from the ground that was lifted while digging. The aim of this is to bury your composting materials with a thin layer of ground to prevent bad odors as well as undesired insects and rodents. Additionally, the ground enriches the compost with beneficial organisms that help speed the decomposing or break down process. Once the pit or trench is filled, you just forget about it, while the organic materials gradually break down over a period of six months to a year, depending on your location and weather conditions. This method is effective if you want decomposing organic matter to be completely out of sight. You may also bury any weedy plants you have pulled up. If buried deep enough, the weed seeds will not have enough energy to emerge to catch the sun light and thus begin photosynthesizing, so they won’t resprout.
Take note that the pit or trench is not easy to harvest though, so it is probably best used to enrich an area where you ultimately want to plant trees or vegetables in. This method comes at no cost but requires extra labor for digging which is a good cardio exercise for you.
Fist test
This is a test to check the amount of water in your compost mixture within the bin or pile. The way to perform it is by grabbing a handful of compost -you should wear gloves- pressing it firmly and checking the amount of water dripping. If there are only a few drops and after releasing the pressure from your fist by opening your hand the pressed compost does not crumble, the moisture content is adequate. If there are no drops and when you open your hand the mixture crumbles apart, it does not have enough moisture and needs more water. If there is too much water runs off while pressing the compost it has excess water and dry materials like leaves, grass or straw should be added to absorb the excess moisture.
Final thoughts
Composting is not a cooking recipe, it is very flexible and it allows for you to use your imagination and availability of materials as to what to add to your bin or pile.
Happy composting!
Thank you for the comprehensive and complete article about composting. I especially like that you have included a list of tools and materials needed. It can be frustrating to get started with a project only to have to go back for a tool or something you didn’t know you needed.
On another note . . . I have found that composting is an ongoing venture when you have a vegetable garden. I take all parts of my plants and put them right back into the compost pile after harvesting. Is there anything that I should add to this fertilizer (compost)?
Thanks again for the information.
-William
Hello William:
You can add any green material to your compost pile. Even meat refuse or leftovers providing you have a compost bin that prevents animals to break in and that keeps bad smells from spreading out. It is very important to keep it moist.
Stay in touch my friend.
Greetings from sunny but chilly México.
Eugenio.
Hi Euginio, I had to laugh a bit when I saw your introduction to tools you needed. A shovel is in Dutch a big earthmover machine:) and definitely not a hand tool. I learned a lot from your post. I didn’t know you could add eg. molasses and yeast or yogurt to the compost for a better result, thank you.
Have a great day, Loes
Thanks for visiting Loes, my friend. What molasses does is feeding yeast and speed up the growth which in turn breaks down organic matter at a faster rate. As for yogurt, molasses (they also feed on it) also speeds up the growth rate of lactobacillus (yogurt bacteria) which improves the quality of compost.
I was not aware that a shovel is a big machine in Dutch hehe 😉
Greetings from México.
Eugenio.
Thank you for providing all this information.
I live in the countryland
Where composting has almost become an obligation.
Every household with a garden
is provided with a special compost entity
just for natural waste and garbage from our kitchens.
And also with a small enclosure for leaves in fall.
It is wonderful to see how this works, naturally…
Thank you for visiting. Keep on composting and stay in touch mi amigo as I will write more posts to enhance information.
Best regards from México.
Eugenio
Hello Eugenio!
You have written a great guide about how to make compost. We have a garden and it is very practical to have our own compost. We have two wooden bins, like the one you described, for our compost. As our garden is not that big it is enough for us.
I didn’t know that the mixture of milk or yoghurt with molasses speeds up the fermenting process, very interesting. Have to try that out! Haven’t thought about putting used tea bags in the compost either. Good idea, because I love to drink tea and there are a lot of tea bags, which I better put in the compost bin instead of the waste bin.
Thanks for telling about the Fist Test. Haven’t thought about that the compost has to have some moisture. By making use of all your tipps, our compost will ferment quickly in the future compared until now.
Kind regards,
Pernilla
Hello Pernilla my friend:
It is so rewarding to read your comment and find that you are getting some useful tips. Keep in touch as I am improving my website with more information.
Saludos desde México.
Eugenio.
Hi Eugenio, very informative article on composting and the many ways to do it. Having a small garden in the fall after frost I put the used plants in my compost, and last year I put the leaves that are raked up on the garden and worked into the soil.
Thanks for the ideas on composting.
Thank you for visiting Wayne. I will add more information and images to my website (under heavy construction). Your kind comments are very encouraging. Saludos desde México mi amigo.
Eugenio.
Thank you for sharing this very informative post. You have provided some valuable information on the different methods on improving composts for veggie gardens. I had no idea that charcoal could be used for composting. Would the ashes work just as well? If so, I will start saving it instead of throwing it away in the garbage. Thanks again for sharing your knowledge on the subject.
Jerome
Hello Jerome:
Thank you for your nice and cheering comments. Yes, ashes are a good addition to compost because they have all the microelements plants need (minerals needed in tiny but important amounts) plus they have the right balance.
Thanks again from México.
Eugenio.
Exciting and exceedingly detailed information. I do compost. Your post filled many of the gaps I hadn’t thought about before. I’m going to bookmark your information for referring to it during the changing seasons. Thanks for sharing.
Hello Kevin:
Your comment is very warming and inspiring my friend. Keep visiting for more information.
Warm regards from México.
Eugenio.
Eugenio, these are great tips to follow for non-chemical synthesis. I especially like the “Alternative Bin” option to compost
a vegetable garden. This seems to be the easiest approach and a cost effective solution that will produce organic
vegetables; and avoid harmful, toxic chemicals that affect your food and the environment.
Thanks for sharing.
Hello Phildora mi amiga:
Thank you for visiting and for your inspiring comment. Keep visiting for more information.
Warm regards from México.
Eugenio.
Ey there partner,
I really enjoyed the information in the Alternative “Bin”! This actually makes it simple enough to where most people can do this and not have to go and purchase too many things in order to get started.
I’ve never really thought about doing any of this but you’ve given us some great instruction here, Eugenio. Are you going to be pointing us to a few good places to purchase the bins?
Thank ya’ for some great information my friend,
Randy
Than you Randy:
I am doing some initial work at my first website my friend. I am glad you find it interesting and yes, I will be adding information about where to find/buy tools and accessories. Stay tuned for more information.
Best wishes from México.
Eugenio.
Thank you! I have always wondered what was really needed for composting and now I see there are several methods I could incorporate. I have just used grass and weeds and small twigs and leaves before and it took some time but what I got was amazing. I live in a very cold northern part of B.C. Canada so patience is a huge key. My yard is big enough that finding a spot for this was easy and it is out of the way so not an eyesore. Thank you again for giving me, even more, ideas for summer! (PLEASE HURRY) LoL
Hi Merry:
Living so far north delay the process, but it still goes on. I will enhance my information my friend. Stay in touch.
Best regards from now chilly México.
Eugenio.
Hey Eugenio:
One of my favorite ways of (long-term) composting is using the pit method.
I live in Hawaii, so the plant growth is absolutely constant. We have no winter die-back…and if you’re a plant person, that means the plants around you tend to get rambunctious and take over the world fairly quickly.
This makes for a lot of green waste. Pits work well for processing the piles. I just keep adding stuff that keeps going down and down and down until there’s room to add more.
As you say, harvesting the resulting compost is not easy, so I don’t. When the things get totally stuffed, they make great tree- and shrub-planting holes.
One side-benefit are the worms that thrive in the pits. I am convinced that the worms that breed in the pits then go forth and populate the rest of the yard, helping to keep things fluffed up nicely.
Hello Netta:
You are right about using pit compost, especially in a climate like Hawaii. Every time you add green waste you just have to cover with either some dirt or mulch from dead leaves or grass clippings to avoid insects and bad smells.
The best advantage of this method is that you do not have to work it out, just leave it and when it is full, start one more and after a couple of months (in Hawaii) you can plant a tree or whatever plant you wish.
Thank you so much for your comment.
Greetings from México.
Eugenio.
Hi Eugenio,
Thanks for sharing a great post about how everyone can make compost at home!
I’m Mexican living in Quebec with my Canadian husband, we use to have a compost in our back yard all the time, our problem here is, there’s a few wild animals that as soon as we take some left overs to the compost, they get there and they get it all.
One year the compost used to be big, but then I noticed every day the compost was getting smaller and smaller, it was a racoon mom with 4 little ones!
This year we got a stray cat!
Now we buy some cat food, so we hope to get some compost for next Spring!
Hola Alejandra:
Tal vez sea conveniente que compren un compostero o que construyan uno de madera. En otro artículo que estoy preparando explico cómo construir composteros de madera. Gracias por visitar mi sitio paisanita. Saludos desde Pátzcuaro, Mich. extensivos a tu esposo.
Eugenio.
Hi Eugenio,
I found this post on how to make improved compost for vegetable gardens very informative. It’s just the information I’ve been needing. Purchasing compost for my garden is an expensive proposition. I like the black garbage bag solution, and I’m going to try that right away. Thanks for the info!
Thank you for visiting Linda. I am very glad to be helpful through my website. Indeed, the garbage bag solution is the cheapest and easy to do.
I will keep on improving and enhancing my information. Stay in touch my friend. Best regards from México.
Eugenio.
Thank you for sharing this information. You helped me make good compost in my garden.
It is my great pleasure Michal. I will keep on improving and enhancing my information. Stay in touch my friend. Best regards from México.
Eugenio.
Thank you Michal:
Keep on composting and stay in touch for more information.
Best regards:
Eugenio.
You certainly have provided a lot of wise information for all of us composting enthusiasts! And, you make it seem so simple and easy to do!
Personally, I work about 3 piles of compost…each one at a different stage of the decomposition process. And, I always keep my fall leaves in a huge pile for use as my “dry (brown) ingredient.” I use my lawnmower to chop them up a bit finer, collecting in the lawnmower bag and then dump them on my ready-to-use dry pile.
I have a question. Do you ever put meat and animal bone & fat into your compost pile? Or, do you only add these to an enclosed compost bin?
Great article! Thanks!
Jim
Hello Jim my friend:
I do not use blood, meat nor bone meal in compost piles except in closed containers to prevent rodents from breaking in and to avoid bad smells, but they certainly increase the nutritional value of the compost, especially calcium, phosphorus and aminoacids besides trace minerals the plants need. Maybe bone meal can be used but I only use eggshells which supply phosphorus and calcium.
In enclosed compost bins there is no problem adding them.
Thank you for visiting my friend.
Eugenio.
Thank you for all the wonderful information. Composting methods are very new to me. I have never grown anything but would love to learn. I plan to have my own garden in the future. I found your article super helpful and informative. My father is very much into gardening. I will have to let him know about this. Keep up with the amazing work!
Thank you for visiting Hong and for your inspiring words. Composting is very easy to do. No exact amounts of anything as in cooking recipes my friend. I hope you get into that soon and if you need some help, I am here for you.
Greetings from México.
Great info on here…really enjoyed it.
My mom’s passion after retirement is gardening so will forward your page to her if you don’t mind. She’ll love this.
I’m also a fan now.
Thanks for the great post.
Hello Luis:
I am glad you enjoyed the information here. You can send the page URL your Mom and all your contacts and social networks. One of the main goals of any website is to attract visitors. Thank you in advance for doing it my friend.
Hi Eugenio,
Great post and from all the replies it is well done and a lot of people wanting to learn the best ways to compost.
Keep up the good work.
thx
bill
Thank you Bill:
It is very rewarding to know that so many people share the same sort of interest in home organic production. I am not rushing to write posts, instead I am trying to do it carefully to provide visitors with quality information.
Keep in touch my friend.
Eugenio.
I am so glad that I met you on Wealthy Affiliate Eugenio which caused me to find your most interesting website. So much valuable content to go through and learn from. You really are an expert on the subject and I have to bookmark your website to be able to come back when needed.
Thanks for sharing all this very valuable information Eugenio.
Best wishes,
John ツ
Thank you John for your kind comments. It makes me happy to be able to help people interested on going organic or improving their techniques.
I am writing a new post and will include images in all posts shortly.
Greetings from México my friend.
Eugenio
Hi Eugenio, I am passionate about composting. I keep a large plastic bowl on my counter and all egg shells, nuts shells, seafood shells, vegetable peelings and so on go in. I drive my partner Larry crazy because I am always going behind him when he is eating nuts or cleaning vegetables and he puts them in the garbage. I’m yelling at him, “Don’t put that in the garbage, it goes in the compost pile!”
I use a very large plastic bin outdoors for the compost. Usually will add dirt, dried leaves, grass clippings, ashes from the fireplace and so on. I turn the compost and work everything in good with a shovel each time I add something. I also have chickens, so once in a while I add in chicken manure to the mix. I had no idea you could add yogurt or any milk products or even yeat and molasses. I live in Florida and I don’t keep any sort of cover over the compost bin but it seems to be breaking down good and yes, it does take a good while but it is well worth the wait.
I enjoyed reading your information about composting and can’t wait to read your other articles.
Hi Cynthia: Using kitchen and garden refuse is a great way of composting with the added advantage of producing less trash. It is a personal way to help the planet about the climate “change” issue ( I call it “crisis”). Dairy products and molasses speed up the composting process and enrich the compost with lactobacillus that prevent harmful fungi and bacteria to spread and inoculate the compost piles and eventually infect plants.
Thank you for visiting. I will be adding more post shortly.